Blender に VRM ファイルを取り込む前に、
右シーンコレクション内の「シンコレクション」以下を全て削除
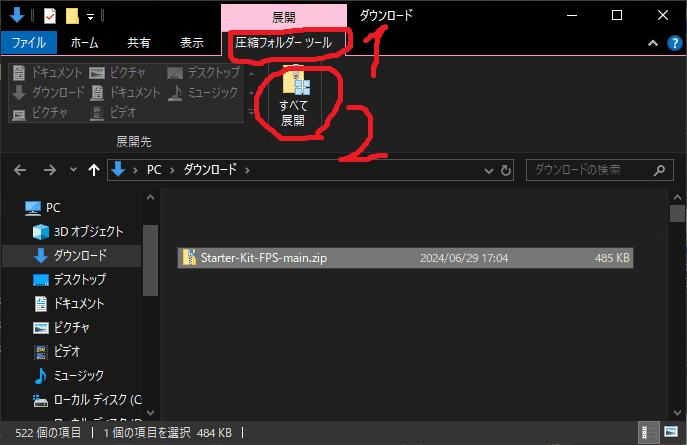
上部メニューの「ファイル」「インポート」「VRM (.vrm)」を選択し vrm
ファイルを取り込む VRM取り込み後、 ICO球を削除(見当たらなければ放置)
glTF_not_exportedを削除(見当たらなければ放置) オレンジ色のArmatureを展開
緑色のArmatureを展開
ウィンドウ上部のメニュー欄の「レイアウト」を選び「オブジェクトモード」にする
左の人物が表示されている枠内で何かボーンをクリックしオレンジ色にする
左上の「オブジェクトモード」を「編集モード」にする
右シーンコレクション内の「Root」以下を展開
右シーンコレクション内の「Root」だけを選択 左ステージ内にマウスを動かして delete
キー(Rootのボーンを削除)
ウィンドウ上部のメニュー欄の「Scripting」を選ぶ(かなり右側にある) 「+
新規」を押す。 下記のスクリプトを貼り付け 右上の実行ボタンを押す
#---------- スクリプトここから ----------
import bpy
for x in bpy.context.object.data.bones:
x.name = x.name.replace("J_Bip_C_", "mixamorig:")
x.name = x.name.replace("J_Bip_L_", "mixamorig:Left")
x.name = x.name.replace("J_Bip_R_", "mixamorig:Right")
x.name = x.name.replace("LeftUpper", "LeftUp")
x.name = x.name.replace("RightUpper", "RightUp")
x.name = x.name.replace("mixamorig:Chest", "mixamorig:Spine1")
x.name = x.name.replace("mixamorig:UpperChest", "mixamorig:Spine2")
x.name = x.name.replace("LowerLeg", "Leg")
x.name = x.name.replace("LowerArm", "ForeArm")
x.name = x.name.replace("UpArm", "Arm")
x.name = x.name.replace("LeftIndex", "LeftHandIndex")
x.name = x.name.replace("LeftThumb", "LeftHandThumb")
x.name = x.name.replace("LeftRing", "LeftHandRing")
x.name = x.name.replace("LeftMiddle", "LeftHandMiddle")
x.name = x.name.replace("LeftLittle", "LeftHandPinky")
x.name = x.name.replace("RightIndex", "RightHandIndex")
x.name = x.name.replace("RightThumb", "RightHandThumb")
x.name = x.name.replace("RightRing", "RightHandRing")
x.name = x.name.replace("RightMiddle", "RightHandMiddle")
x.name = x.name.replace("RightLittle", "RightHandPinky")
#---------- スクリプトここまで ----------
右シーンコレクション内の
緑色のArmatureを展開、名前を変更する際に狭く
見えにくいので、右シーンコレクションを広げておくことを推奨
ウィンドウ上部のメニュー欄の「レイアウト」を選び「編集モード」にする
足の指にあたるボーン(丸豆だけでなく三角錐)をクリックし選択状態にして、
そのボーンを右クリックして「細分化」
(足の左右を実施する)
右上の 緑色のArmatureを展開していき
細分化した、「mixamorig:LeftToeBase.00?」を「mixamorig:LeftToe_End」にリネーム
細分化した、「mixamorig:RightToeBase.00?」を「mixamorig:RightToe_End」にリネーム
######## ここまで必須 ########
######## 手の指関節追加は任意 ########
手の指にあたるボーン(丸豆だけでなく三角錐)をクリックし選択状態にして、
そのボーンを右クリックして「細分化」
(左右の手を実施する)
右上の 緑色のArmatureを展開していき
細分化した、「mixamorig:***3.001」を「mixamorig:***4」にリネーム
任意の指の数だけ実施
######## 手の指関節追加は任意ここまで ########
右シーンコレクション内の「シーンコレクション」配下に
「コレクション」を一段作り、その中に
コライダー(Colliders)やら Armature やら Body や Face 等
すべて移動
「コレクション」のプルダウンを閉じる
右シーンコレクション内の「シーンコレクション」配下に
「コレクション」を一段作り、その中に
fbx ファイルをインポートする。
アドオンの「Rokoko」のメニューを出す
rokokoを使わないバージョンもあります。
「Retargeting」のプルダウンを広げる
ソース: に、今読み込んだ方の Armature(たぶん 001 が付いている)を選ぶ
ターゲtット: に、もともとの Armature(たぶん無印)を選ぶ
「Build Bone List」のボタンを押す
リストが出るので、左と右に同じ名前が入っているか確認する
たまに、間違えているので注意する。
入ってなければ入れる。
「Retarget Animation」を押したいが、その下の「保存」を押しておくと
次回以降の Bone List が間違いなくなるので「保存」を押しておく
「エクスポート」を押しておくと、Json ファイルが出力できる。(PC故障して交換したとき等は、Jsonファイルを読むと楽なはず)
あと、インポートしたファイルと、モーション適用先のポーズを「REST(T-Poseになるはず)」にして、
モーションの左右向き、上下向きを合わせておかないとおかしなモーションを取り込むことがある。
「Retarget Animation」を押す。
ウィンドウ上部のメニュー欄の「アニメーション」を選ぶ
ウィンドウ下部の左隅にある菱形のマークを含む模様(アイコン?)
の1マスのプルダウンを展開し、
ノンリニアアニメーションを選択する
もともとの Armature(たぶん無印)の直下にあるオレンジ行の
「~~ Retarget」の横にある、下向き三角と四角2個が書いてあるアイコンをクリックする
<アクションなし>が増える
<アクションなし>の真下の行の名前を、今読み込んだ行動の任意名称に変更しておく。
これで読み込まれたはず
<アクションなし>をクリックし右の方に出た
「新規」の左隣の菱形のマークを含む模様(アイコン?)をクリックする
「~~ Retarget」を選択する。
右シーンコレクション内に追加していたコレクションを
丸ごと削除する
Armature.001 のようなものが残ったら、それも削除する
また、右シーンコレクション内の「シーンコレクション」配下に
「コレクション」を一段作り、その中に
fbx ファイルをインポートする~~を繰り返す
blender は vrm ではなく glb 出力
glb 出力する前に、
ウィンドウ上部のメニュー欄の「レイアウト」を選び「オブジェクトモードにして」
キャラクターがいる欄の何もないところを一旦クリックし
「a」キーを押して全選択状態にしてからエクスポートする
顔の表情をシェイプキーの設定の情報だけの状態ではなく、
Armature(オレンジ色) のアニメーションと同等に、godot 内から
アニメーションとして扱いやすくする方法が下記。
(godot で作る内容次第なので必須ではない)
右シーンコレクション内の「シーンコレクション」配下に
下向き三角形(オレンジ色)の「Face」の選択状態にし、
ウインドウ右下のいろんなアイコンが縦に並んでいるタブの
緑いろの下向き三角形を選び
「アニメーション」の欄を展開して、シェイプキーの下にある「+ 新規」を押す
任意の名前を付ける(今回は d-eyes-closeとする)、
その入力欄の右にある2重の四角形(新規アクション)のボタンを押す
ウィンドウ上部のメニュー欄の「アニメーション」を選ぶ
ウィンドウ下部の左隅にある菱形のマークを含む模様(アイコン?)
の1マスのプルダウン(アイコン?)を展開し、
「ドープシート」を選択する。
その1マスのプルダウン(アイコン?)の右隣のプルダウンは
「シェイプキーエディター」を選択する
その下にタイムラインのようなものと、「概要」を展開すると
Fcl_~みたいなリストが並んでいるはず。
0.000 から 1 に変えることで、設定済の表情(顔の部位の変更)ができる
(今回は、Fcl_EYE_Close を 0.000 から 1 に変える)
先ほど、「シェイプキーエディター」を選択したやや右に
「ストリップ化」があるので押す
顔の表情を増やしたい場合は、
右シーンコレクション内の「シーンコレクション」配下に
下向き三角形(オレンジ色)の「Face」の選択状態にするところから繰り返す。
(ちなみに、表情を増やしたい (NLAトラックが増えていきます) 場合は、
「シェイプキーエディター」で変更したままの状態(表情)になっているので、
新規の表情を作るときは、前の表情を戻すことを実施)
glb の出力
出力方法は、「レイアウト」タブにして「オブジェクトモード」、
左枠内の何もないところでクリック後に「a」で選択した状態でエクスポート。
Animation を godot に取り込む方法(.resファイルにする)までは一緒
.res を取り込んだ後に、AnimationPlayer で、
表情の Animation についている「顔以外の動作」(T-Pose)になっていると思うが
Animation のトラック内に表示されている、〼 Face 配下の「緑丸 Fcl_~」は残し、
「Skeleton3D」配下の 赤紫マークから始まるの mix~ だったり
茶色十字からはじまる行は削除(ゴミ箱マークをクリック)しましょう
目を閉じるアニメーション等、表情が変わるアニメーションを選んで、表情が変わることを確認したあとに、
ジャンプなどのアニメーションをえらんで、表情が戻ることなくそのままでジャンプなどの動作を
実施していることを確認する